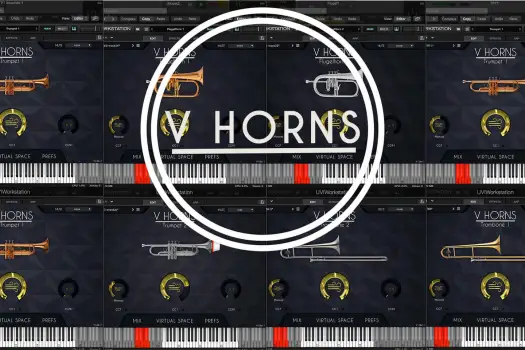
Audio demos created with the instruments
The same phrase, played by the musician and recreated with the instrument.
Thanks to our proprietary H.A.T. (Harmonic Alignment Technology), VHorns is not just another heavily multi-sampled instrument - you can play articulations exactly like a live player would, with just a mod wheel to control air flow (or even just by drawing in automation).
There are no elaborate keyswitches involved to play staccatos, marcatos, legatos or double tongues - you simply load up the instrument in your DAW and play. Vibrato can even be automated.
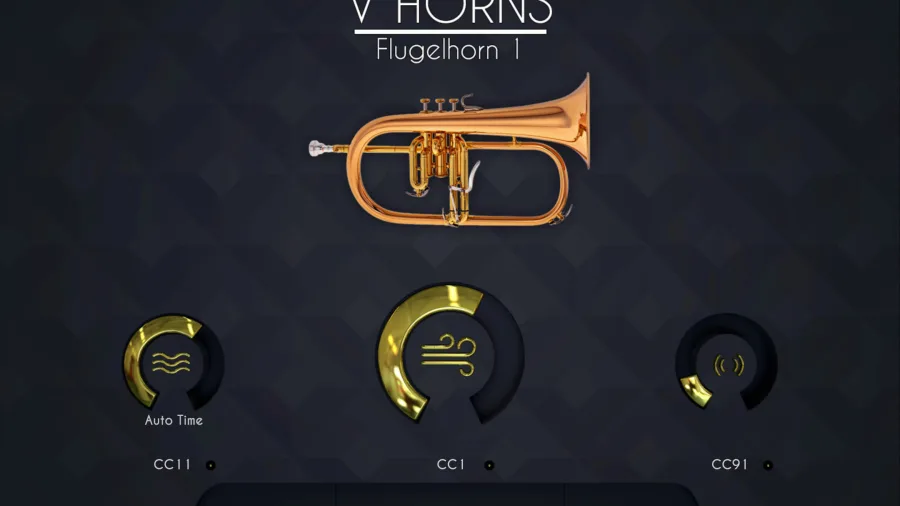
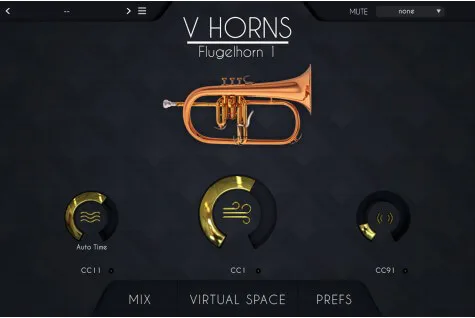
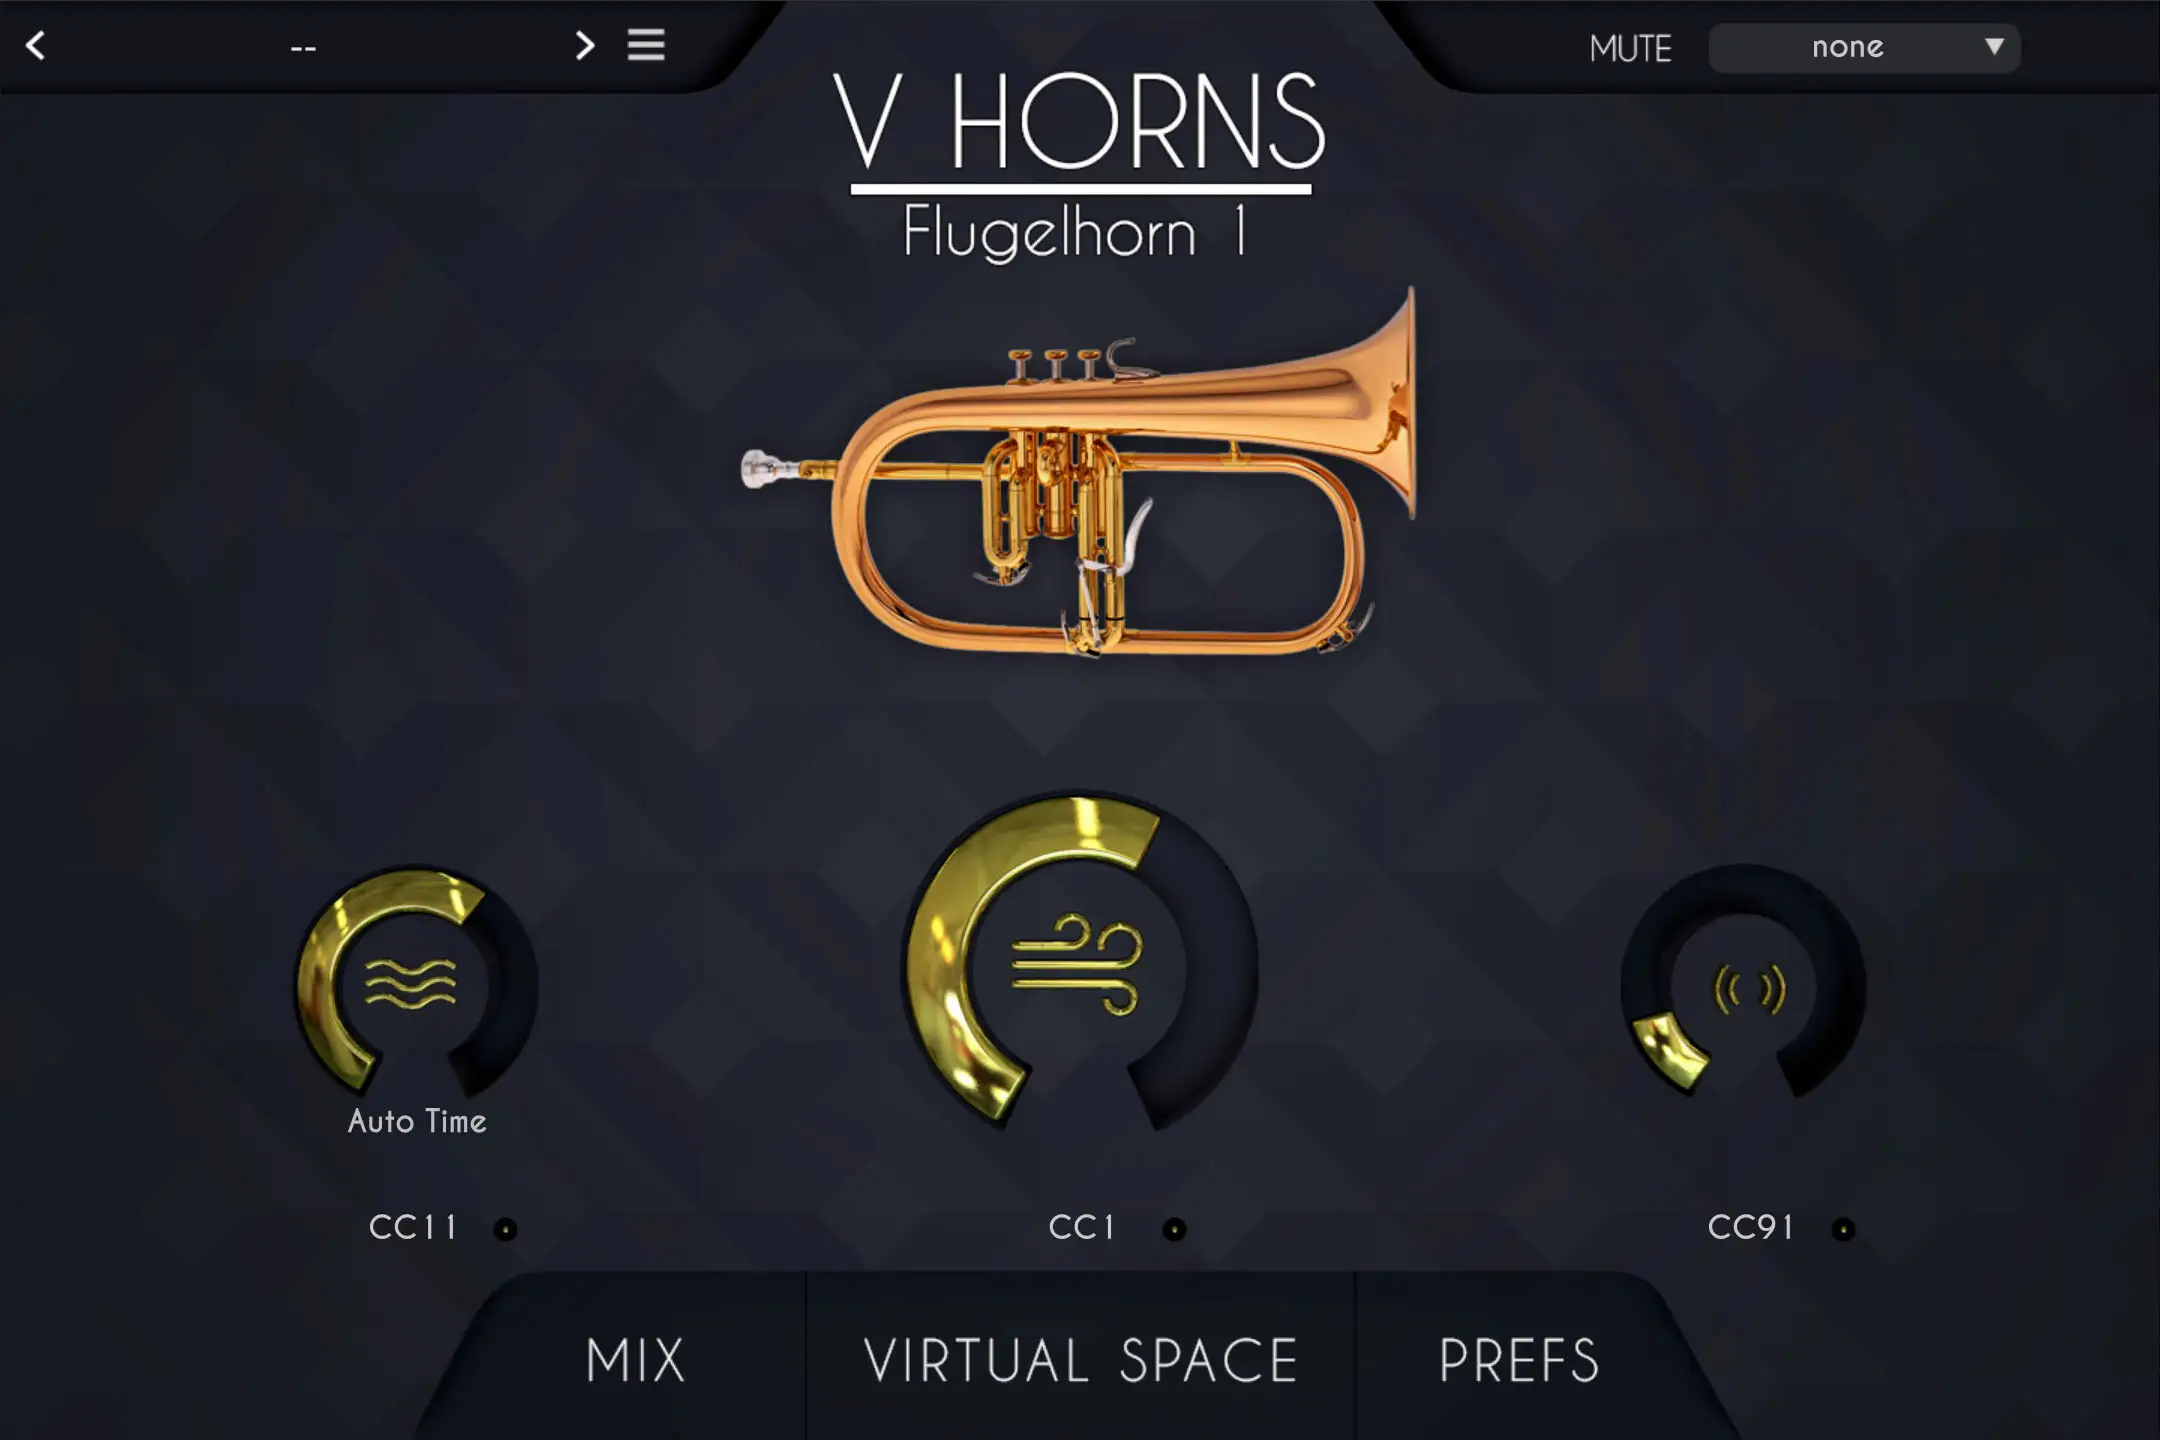
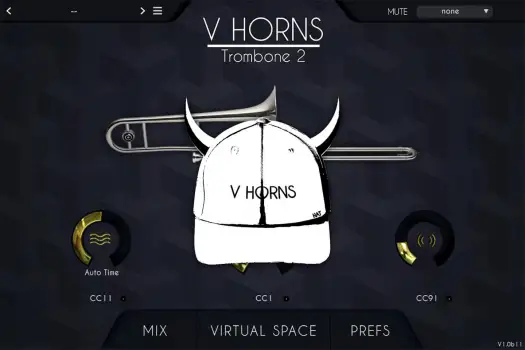
Air flow is controlled by the central dial on the main page of the interface.
When this is set to 0, there will be no sound produced, just as if you didn't blow any air into a trumpet.
You can of course control this value with different CCs. We set it to the modulation wheel by default because it's available on almost every digital keyboard, but you can use anything you like, for example CC2, which is the default for most breath controllers - all you need to do is click on the small dot next to the CC number and move the controller you want to assign.
Vibrato can also be controlled with the air flow - to enable/disable this, go into the PREFS panel and change the "allow vibrato with air flow" value. Once this is enabled, moving the air flow controller up and down will begin to add pitch variation to the sound.
In some rare cases, and sometimes when using MIDI files imported from softwares like Sibelius, you only get velocities, so at the bottom of the CC list we added the possibility to control the air flow with the incoming velocity - just select "VEL".
You also have the option to use the pitch bend as the input CC, you can do so by choosing "P. BEND" from the list.
We carefully measured the different parameters that change when a brass player uses vibrato and we combined everything into a highly realistic and customizable vibrato for VHorns.
There are multiple ways to control the vibrato: automatic, automatic depending on time, and manually.
Vibrato is controlled with the left dial on the front panel of the interface.
Immediately below the dial is a small menu with 3 options:
1- Auto: this enables automatic vibrato and the dial will control how much vibrato is added to the sound.
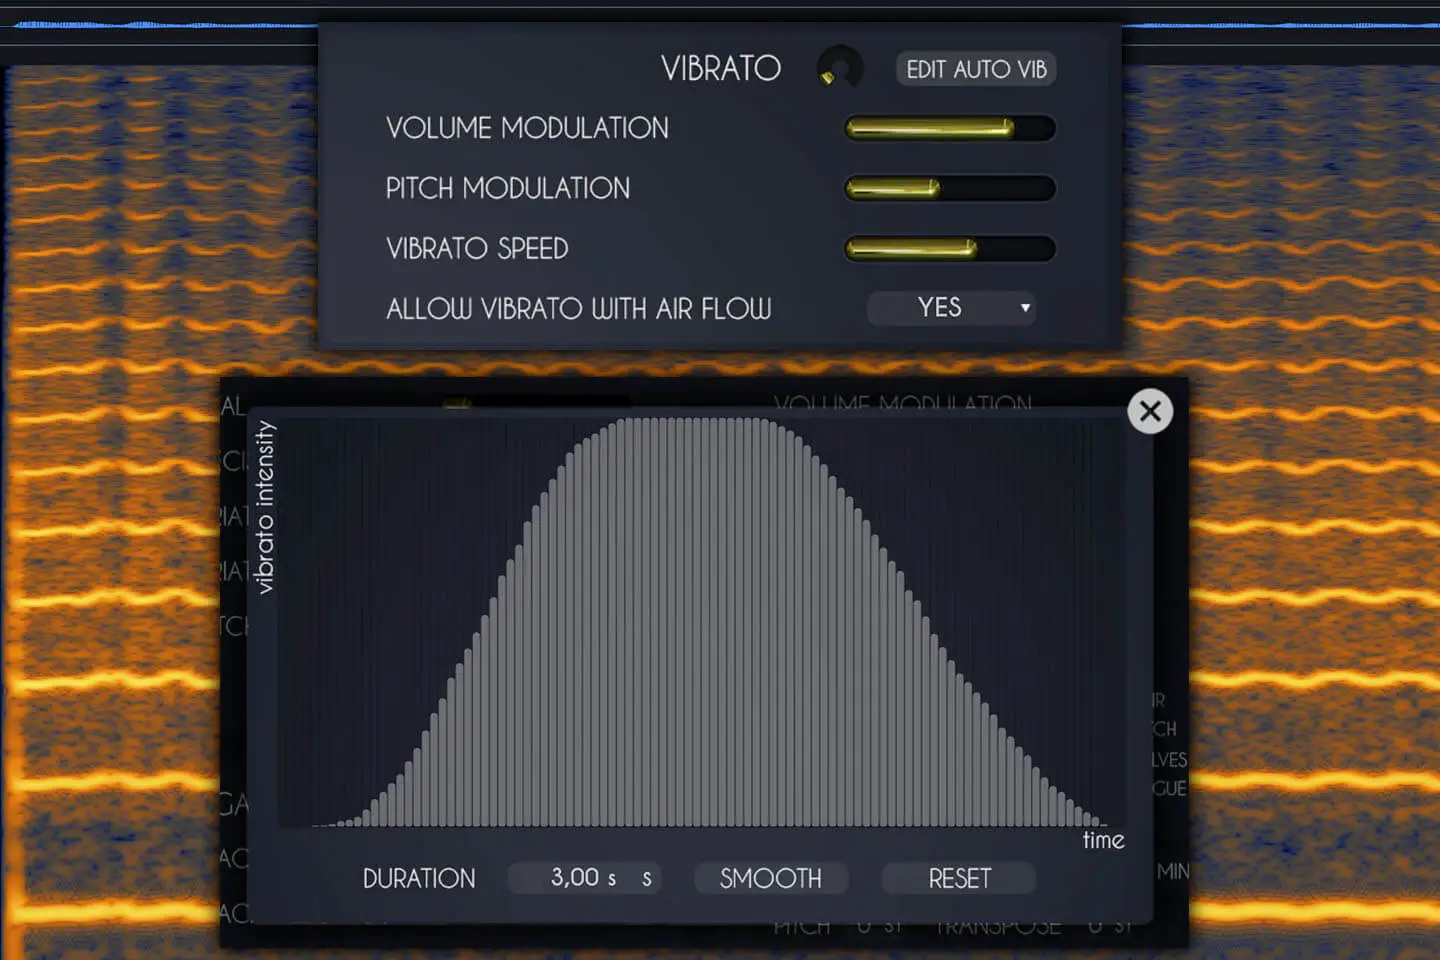
2- Auto time: This is similar to Auto mode, but a time envelope will control the amount of vibrato. You can edit this envelope in the preferences by clicking on "edit auto vib". This opens a small panel that displays a table to let you control the duration and intensity of the vibrato.
3- Manual: This is for advanced use and conrol over vibrato. In reality, a trumpet player changes the shape or position of their mouth on the mouthpiece to change the pitch up and down. In this mode, the neutral position (with no pitch change) is the middle value of the dial and a value of 0.5 (and CC at value 64). Values below 0.5 will result in a lower pitch and values above 0.5 will result in a higher pitch. This is very useful for creating vibrato that doesn't have a fixed speed.
As mentioned earlier, there is a fourth way to create vibrato, using only the air flow control. The "allow vibrato with air flow" setting has to be set to ‘yes' in the preferences and you then need to perform a fast up and down variation in whichever controller you use for the air flow.
In the preferences, you have options to customize the vibrato even further to control vibrato (these options affect all 4 modes above).
1- There is a small dial that controls the overall amount of vibrato. This can be set to some very high values that will sound very unnatural to some, but that is necessary for using some dedicated wind controllers that have a narrow CC range.
2- You can change the amount of volume modulation: vibrato isn't just a change in pitch, it's also timbre and volume changes; you can control how much of this you want here.
3- You can of course change the amount of pitch modulation as well.
Some controllers like the EWI use the pitch bend as the vibrato source, so we added the P. Bend option to the bottom of the CC list in case you want to use it for the vibrato and not bends.
Fast legato transitions are often the main give away that an instrument is virtual rather than real, so we spent a considerable amount of time and effort carefully extracting every tiny detail of several recorded live transitions to make ours indistinguishable from a real performance.
These transitions range from lightning fast note changes to extremely slow bends, with and without extra attack. We covered everything - and you have complete control.
The legatos behaviour can be adjusted and even randomized for more life-like performances.
When you play a legato on the keyboard (when you overlap two notes), our engine will automatically stop the first note and play a legato instead of a normal sustain.
This is exactly what happens on a real brass instrument when the air flow is continuous while the player changes the note. There are a number of ways to play these legatos and we gave you access to everything so that they can be controlled in real time.
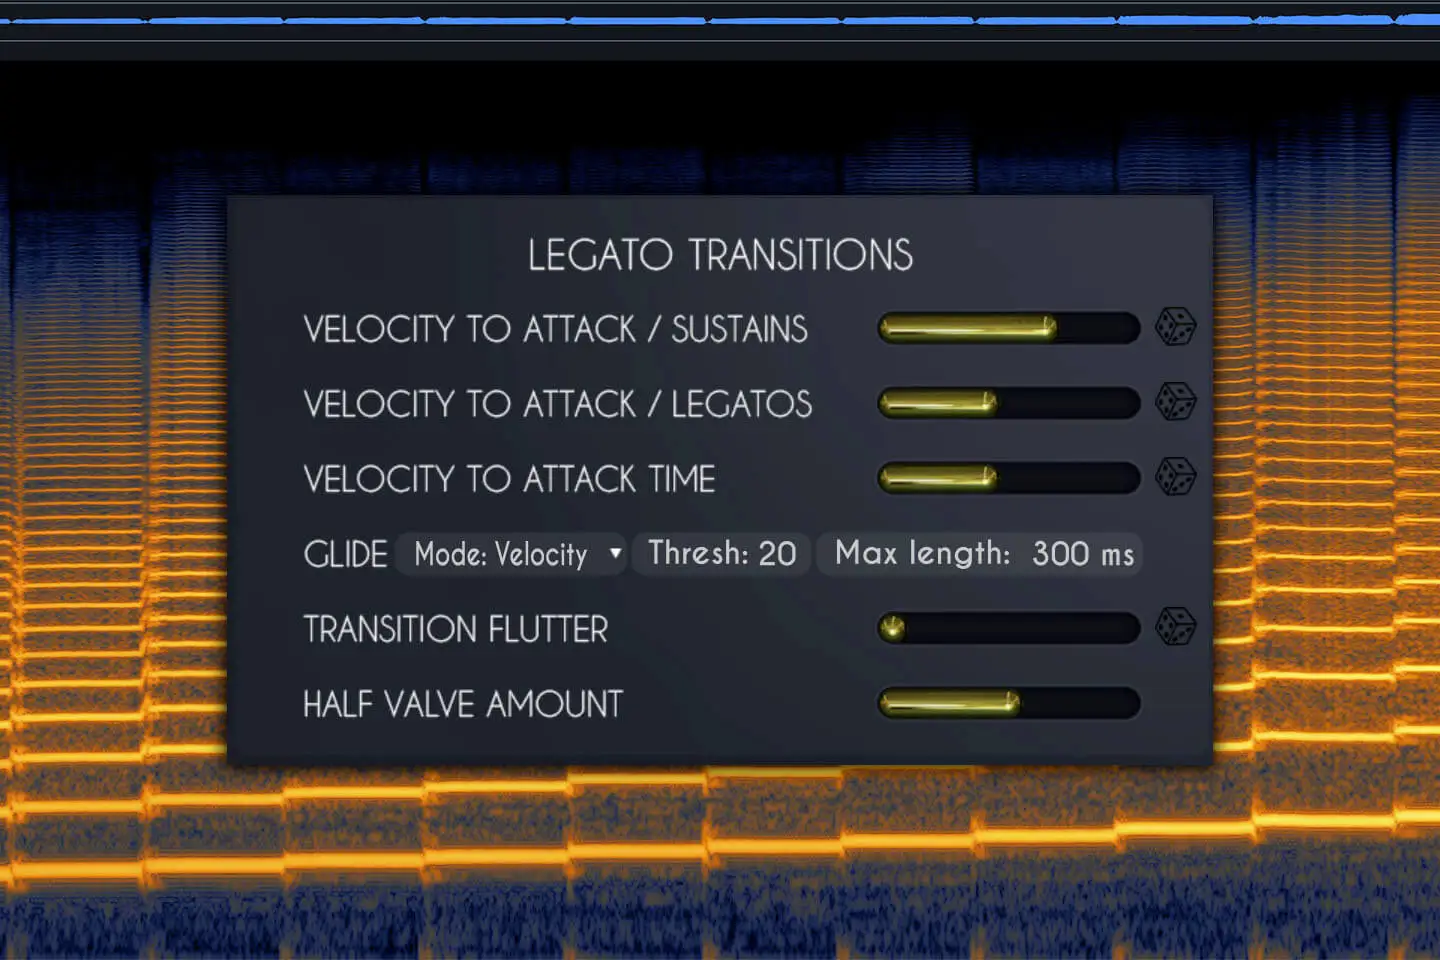
1- Velocity to attack / sustains : This controls the way new sustained notes are played, for example if the air flow is at a CC value of 75 and you play a note at velocity 20, our engine will ramp the air flow from 20 to 75 and thus create a quick volume raise. And vice versa - if the velocity is above the air flow value, it will create a quick attack. The duration of this ramp is controlled by the velocity to attack time value.
2- Velocity to attack / legatos : This controls how legato notes are played, and the procedure is identical to that for sustains, but for legatos it covers the joins between different notes rather than sustained notes on their own. This feature is very useful on woodwind instruments as many players play legato notes with a slight crescendo between notes, so to replicate this, all you need to do is play every new legato note at a low velocity.
Glides are often associated with brass instruments, and so we wanted to include them as an option, triggered by a number of different methods listed below.
1- Mode: velocity. In this mode, any velocity below the threshold value will trigger a glide and its duration will depend on how low the velocity is. For example if the velocity is at 20, it will be a fast glide (comparable to a legato time), but a velocity of 1 will trigger a slow glide at the duration of the max length value you set.
2- Mode: CC. In this mode, you can control the glide duration with a MIDI CC, again it will go from the Max length value when the CC is at value 1 to standard short legatos when the CC is set to value 120 and above.
3- Mode: Manual. In this mode, the glide value is fixed and the glide speed can go from 50ms to 500ms. We added a randomize time value to give it a natural feel, but bear in mind that when increasing the randomize value, the engine can technically receive a value below 50ms in which case it will play a slow legato.
4- In addition to these, you can glide using the pitch bend, and the max pitch bend value will determine the bend range. The quality of that bend will depend on the "use advanced pitch bend value". Keep in mind that that using this option will take up more CPU, even when you’re not actually playing pitch bends.
When a brass player plays any note, if they are very precise, they will directly land almost exactly on the correct pitch and create a very precise attack, but it is often also "missed" on purpose and a quick flutter attack then happens. You can use the Transition flutter value to control how much of this you want. Right click on this slider (just like for any other slider) to choose to control it with a MIDI CC or a host automation.
Another very important aspect of legatos is what happens during the transition itself. On a trombone, there are no valves, so the transition is just air change. On valve instruments, however, there is something called half-valve which happens while the valve is being pressed. This effect can be noticed on two occasions: while playing gliding legatos or when using the pitch bend. You can control how much of that effect you want for each situation.
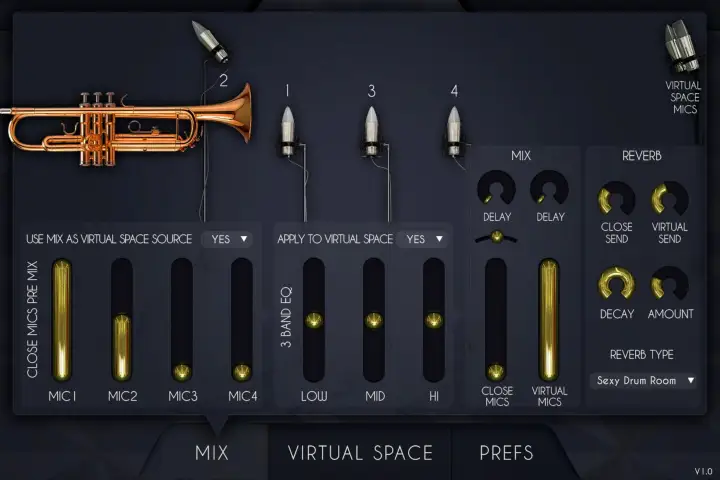
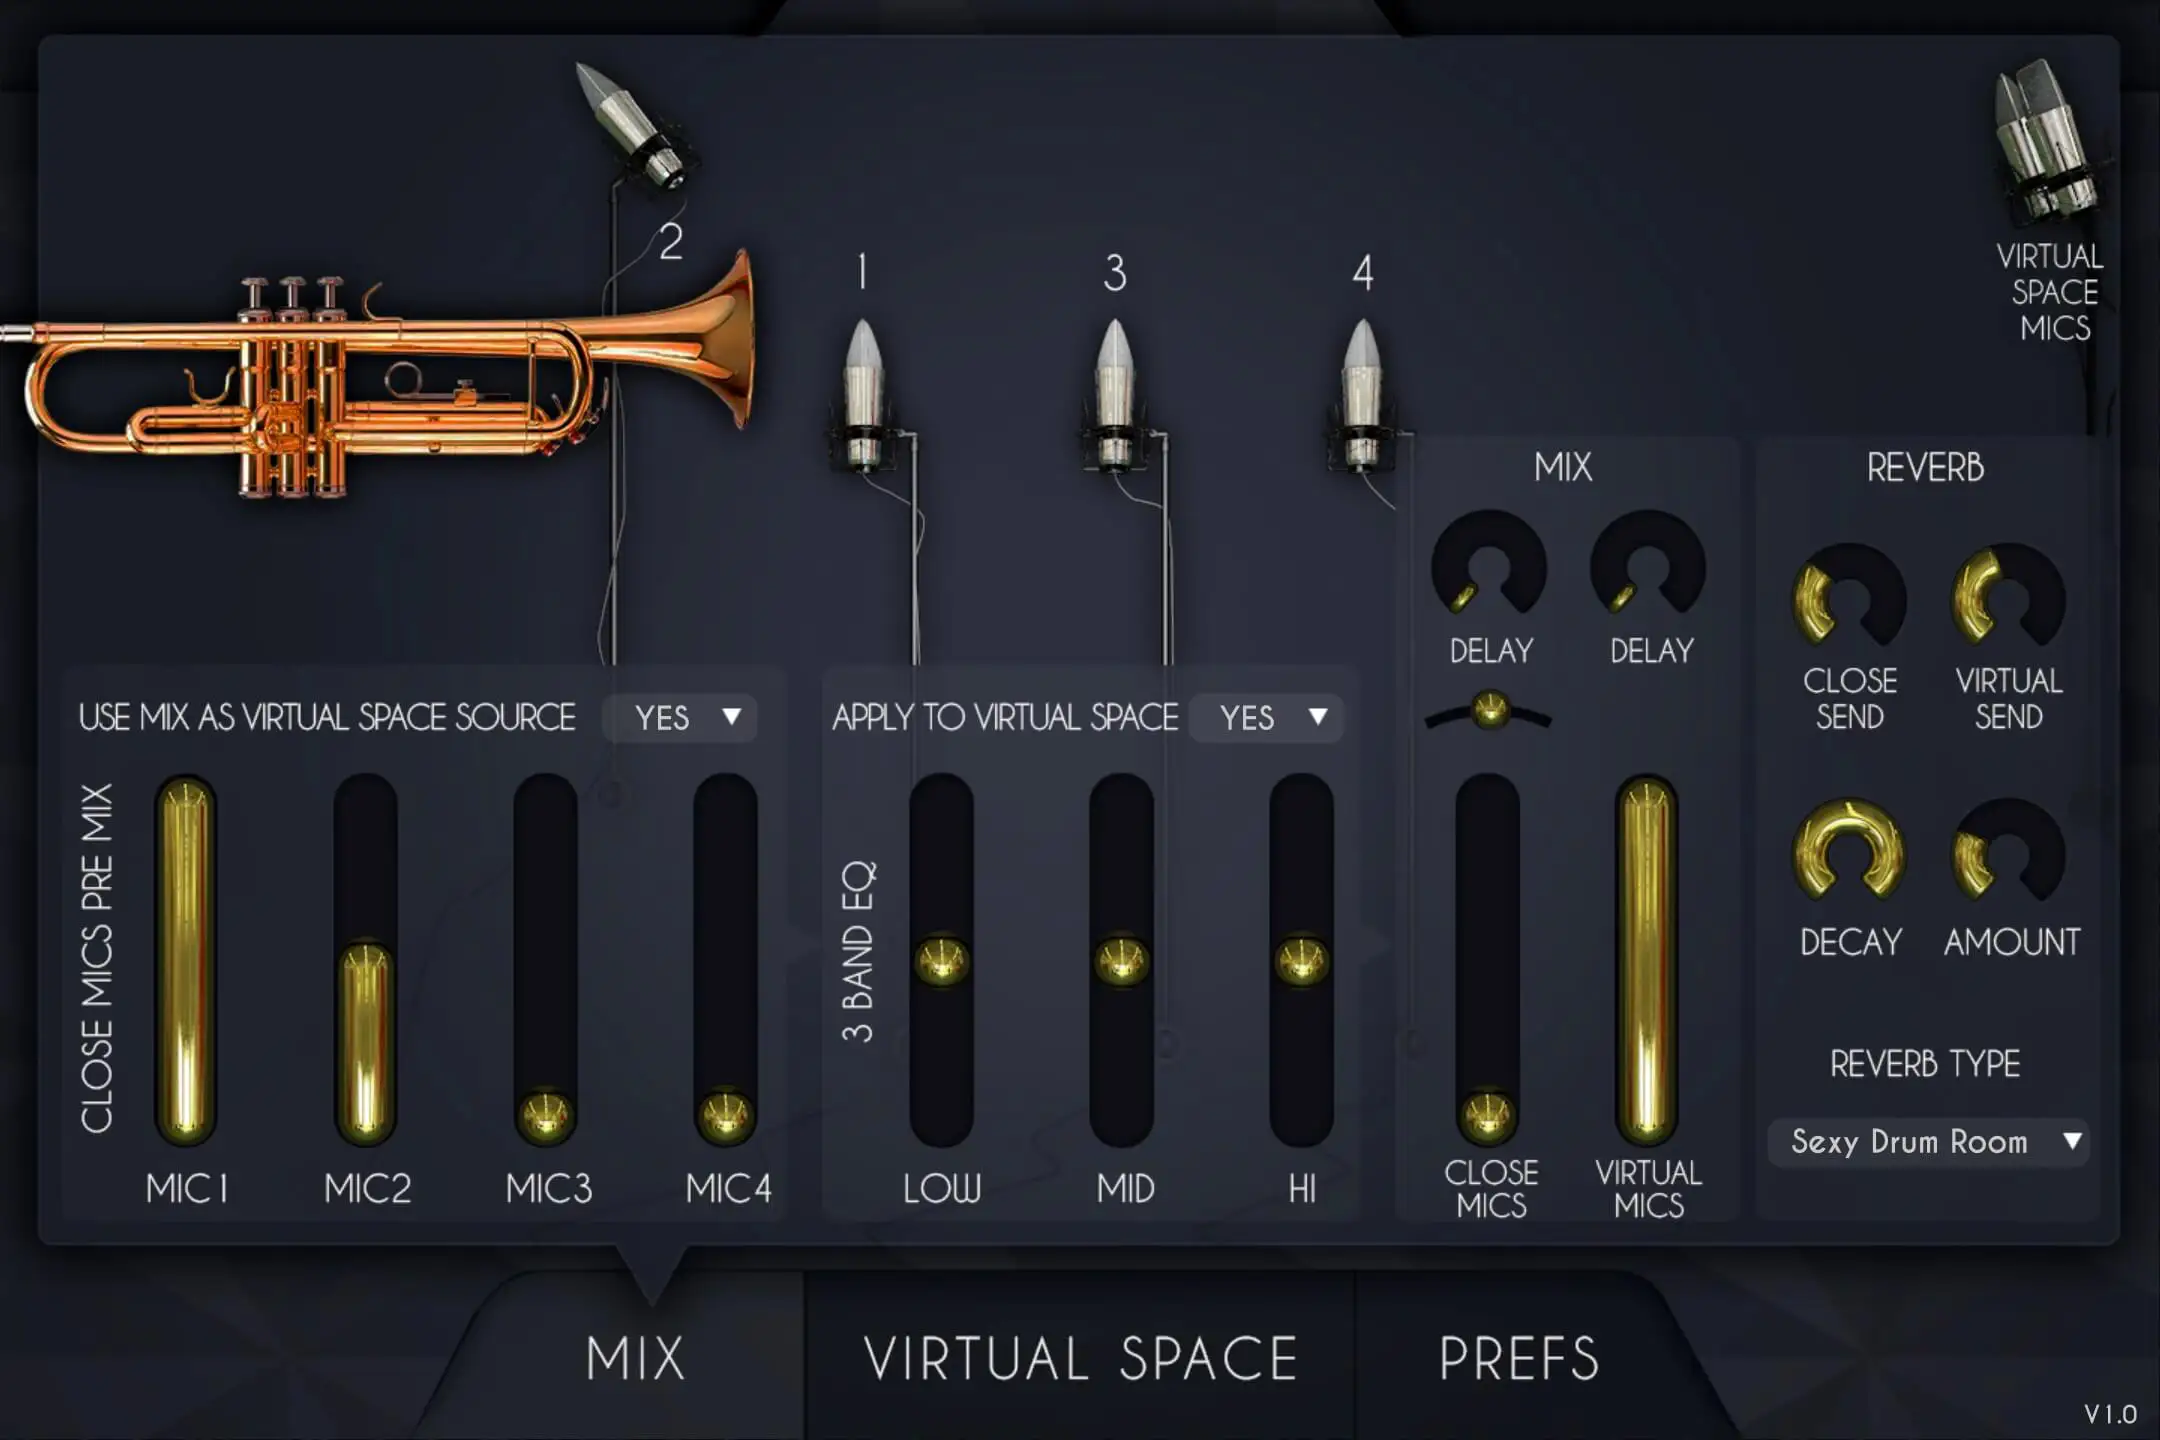
Recording a brass instrument can be done in various ways and at different positions. We used 4 different microphone positions so that you can get the exact sound you want, as if you had chosen the microphone placement yourself.
This can produce even better results when using the "virtual space”, detailed below.
You can apply reverb and EQ to mix it completely to your taste.
MIX Tab
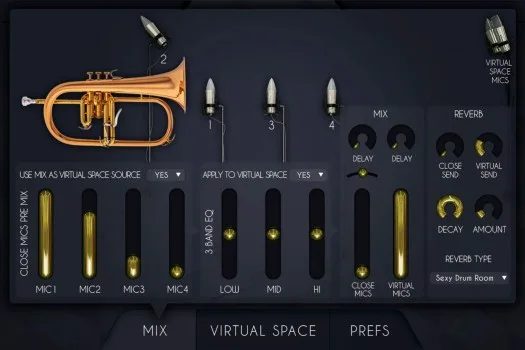
We recorded each of our instruments with 4 different microphones at 4 different positions to capture their unique sounds - you can mix these however you like. At the top you can also change the routing, as explained below; we created the Virtual Space, which places the instrument in a virtual environment, which is technically a virtual room mic pair that you can move around. Here, you can choose if you want the source for the virtual space to be just the close mic or a mix of the 3.
We also added a 3 band EQ, which you can also decide to apply to the source sound for the virtual space.
You can mix the result of the 4 microphones and the virtual mics, and we added a pan and delay for each to deal with phase problems that always occur when multiple microphones are involved.
You can also add impulse response reverb to the whole mix, control its decay and how much is sent from the close microphones and from the virtual space. The amount on the mix panel is the same as on the front interface.
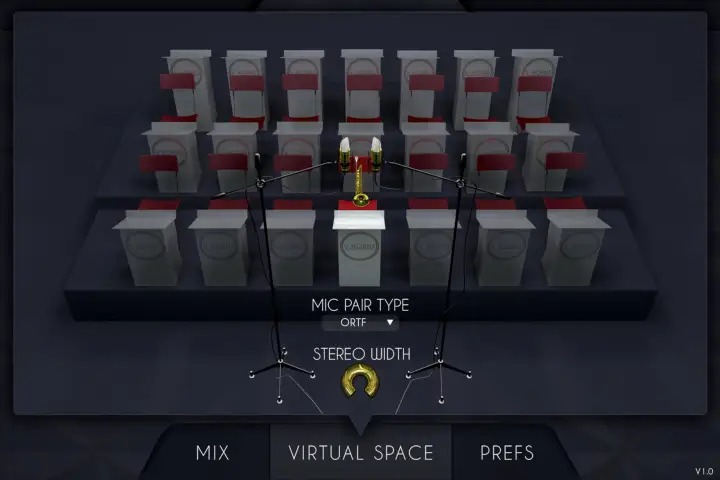
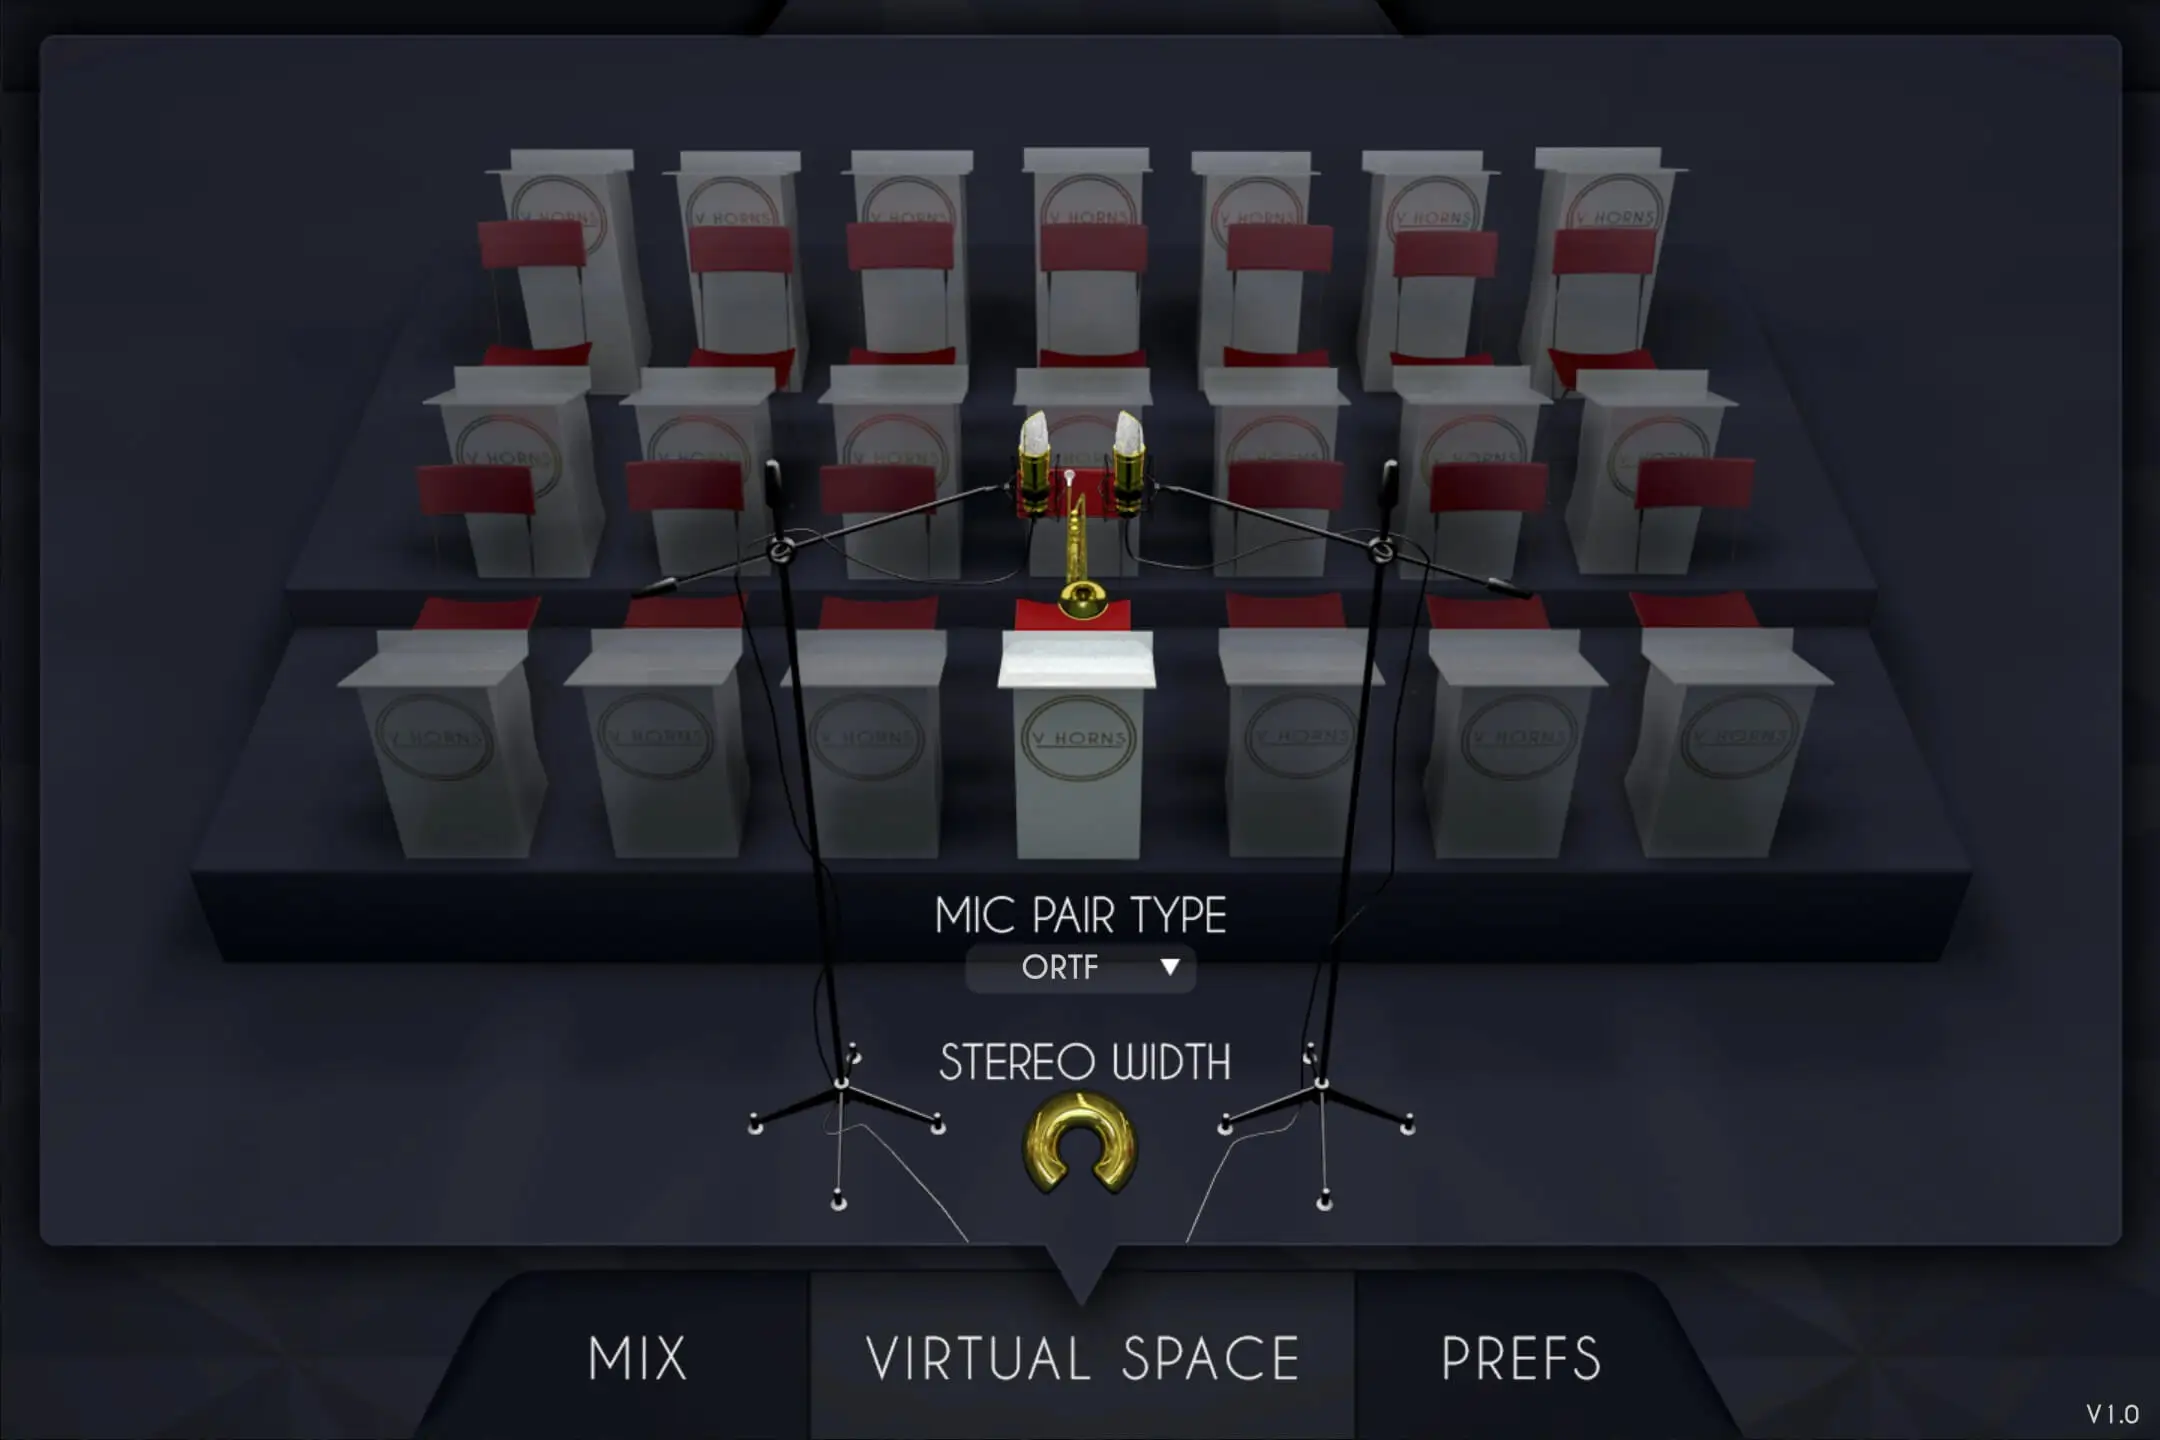
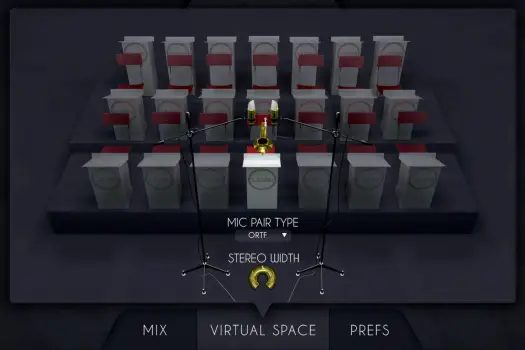
The virtual space perfectly replicates a real recording of an ensemble, using convolution. When you record a big band, you usually place a pair of microphones in front of the musicians and they naturally take position in the stereo field depending on where they are in the room.
The Virtual Space does exactly the same thing; you can place the musician wherever you like.
When using this with multiple tracks, you immediately have the feeling of being in front of a real horns section.
Virtual Space tab
Simply using panning to place elements in the stereo field does not sound as realistic as possible, as much information is left out, so we recreated a whole room placement simulation based on impulse responses, where you can set the position of the instrument in the room itself.
Since there are so many ways to set up an ensemble recording, in terms of both musician placement and microphone pair selection, we decided to include as many customizable possibilities as we could.
With VHorns Virtual Space, you have access to 21 positions divided into 3 rows and you can select which microphone configuration you want to use (ORTF, AB, XY, Binaural and MS), as well as control the stereo width for a narrow or wide section.
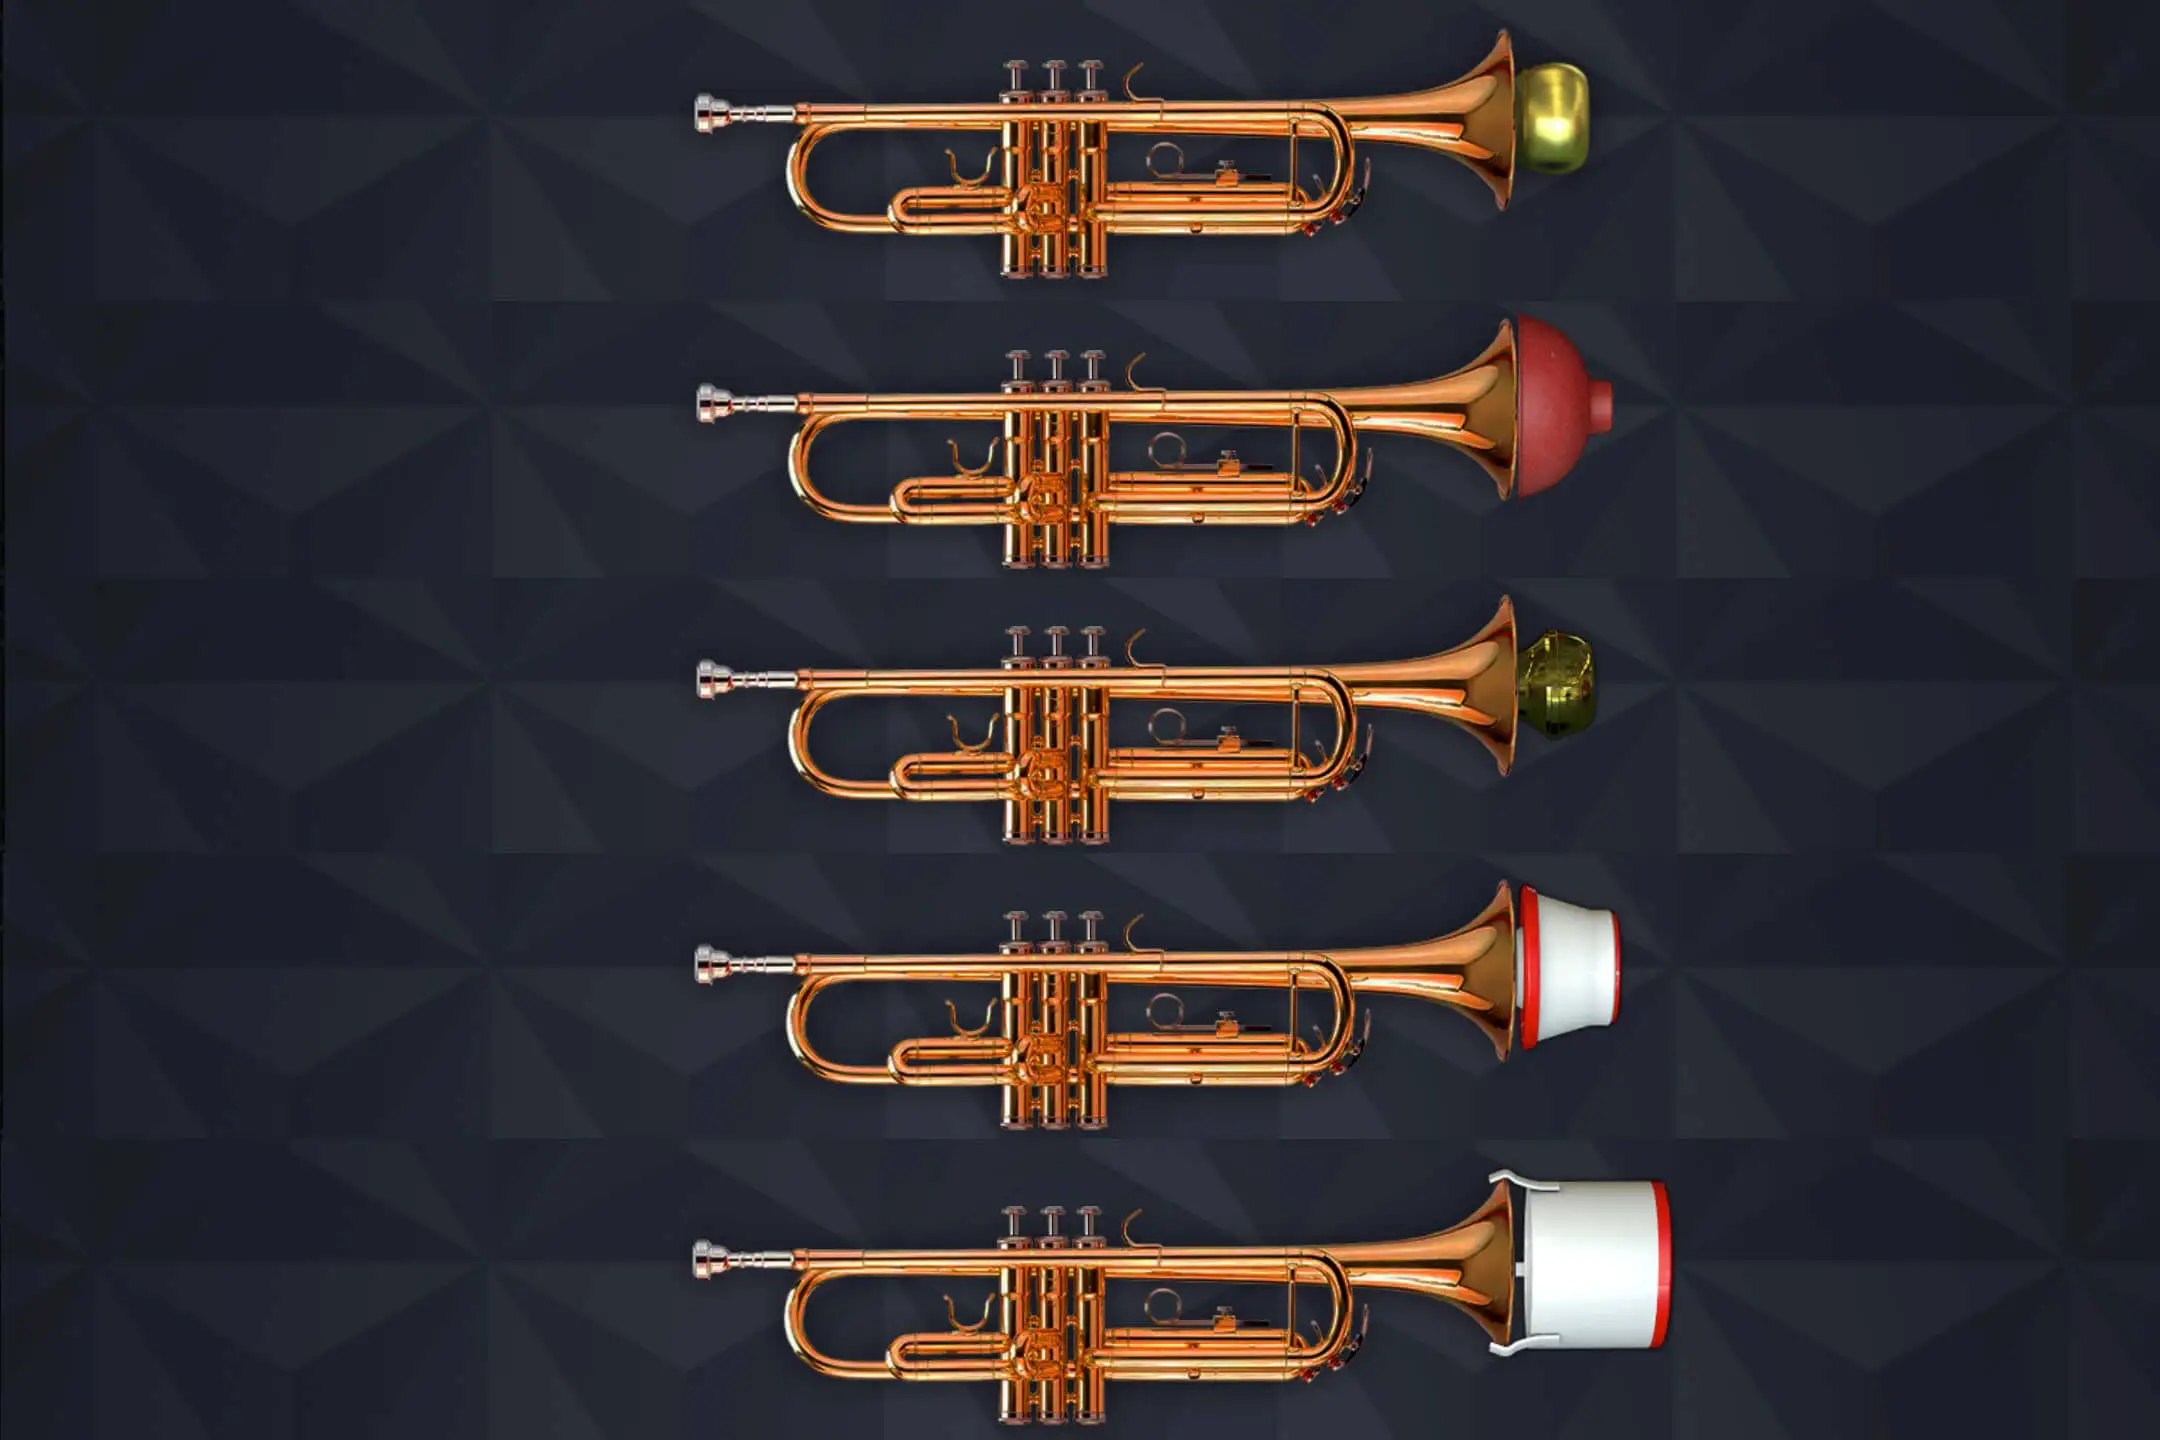
No Big Band horn section would be complete without mutes - they are an integral part of the sound. VHorns offers a variety of mutes on all 3 instruments: Plunger, Straight, Cup and Bucket.
Simply select the mute you want in the top right corner of the instrument’s interface and start playing.
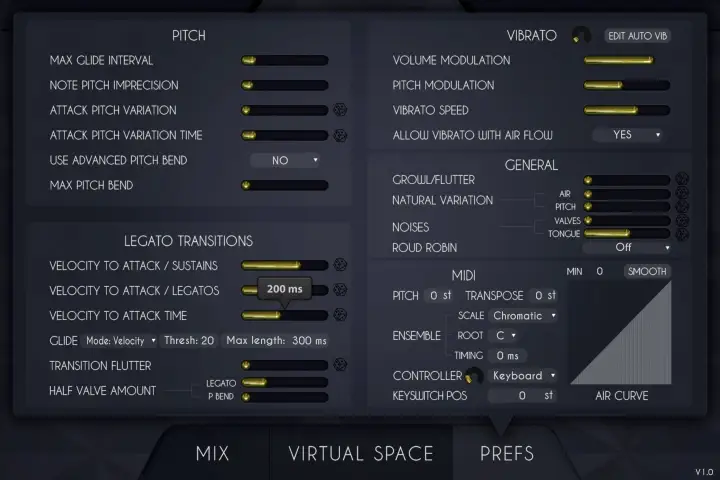
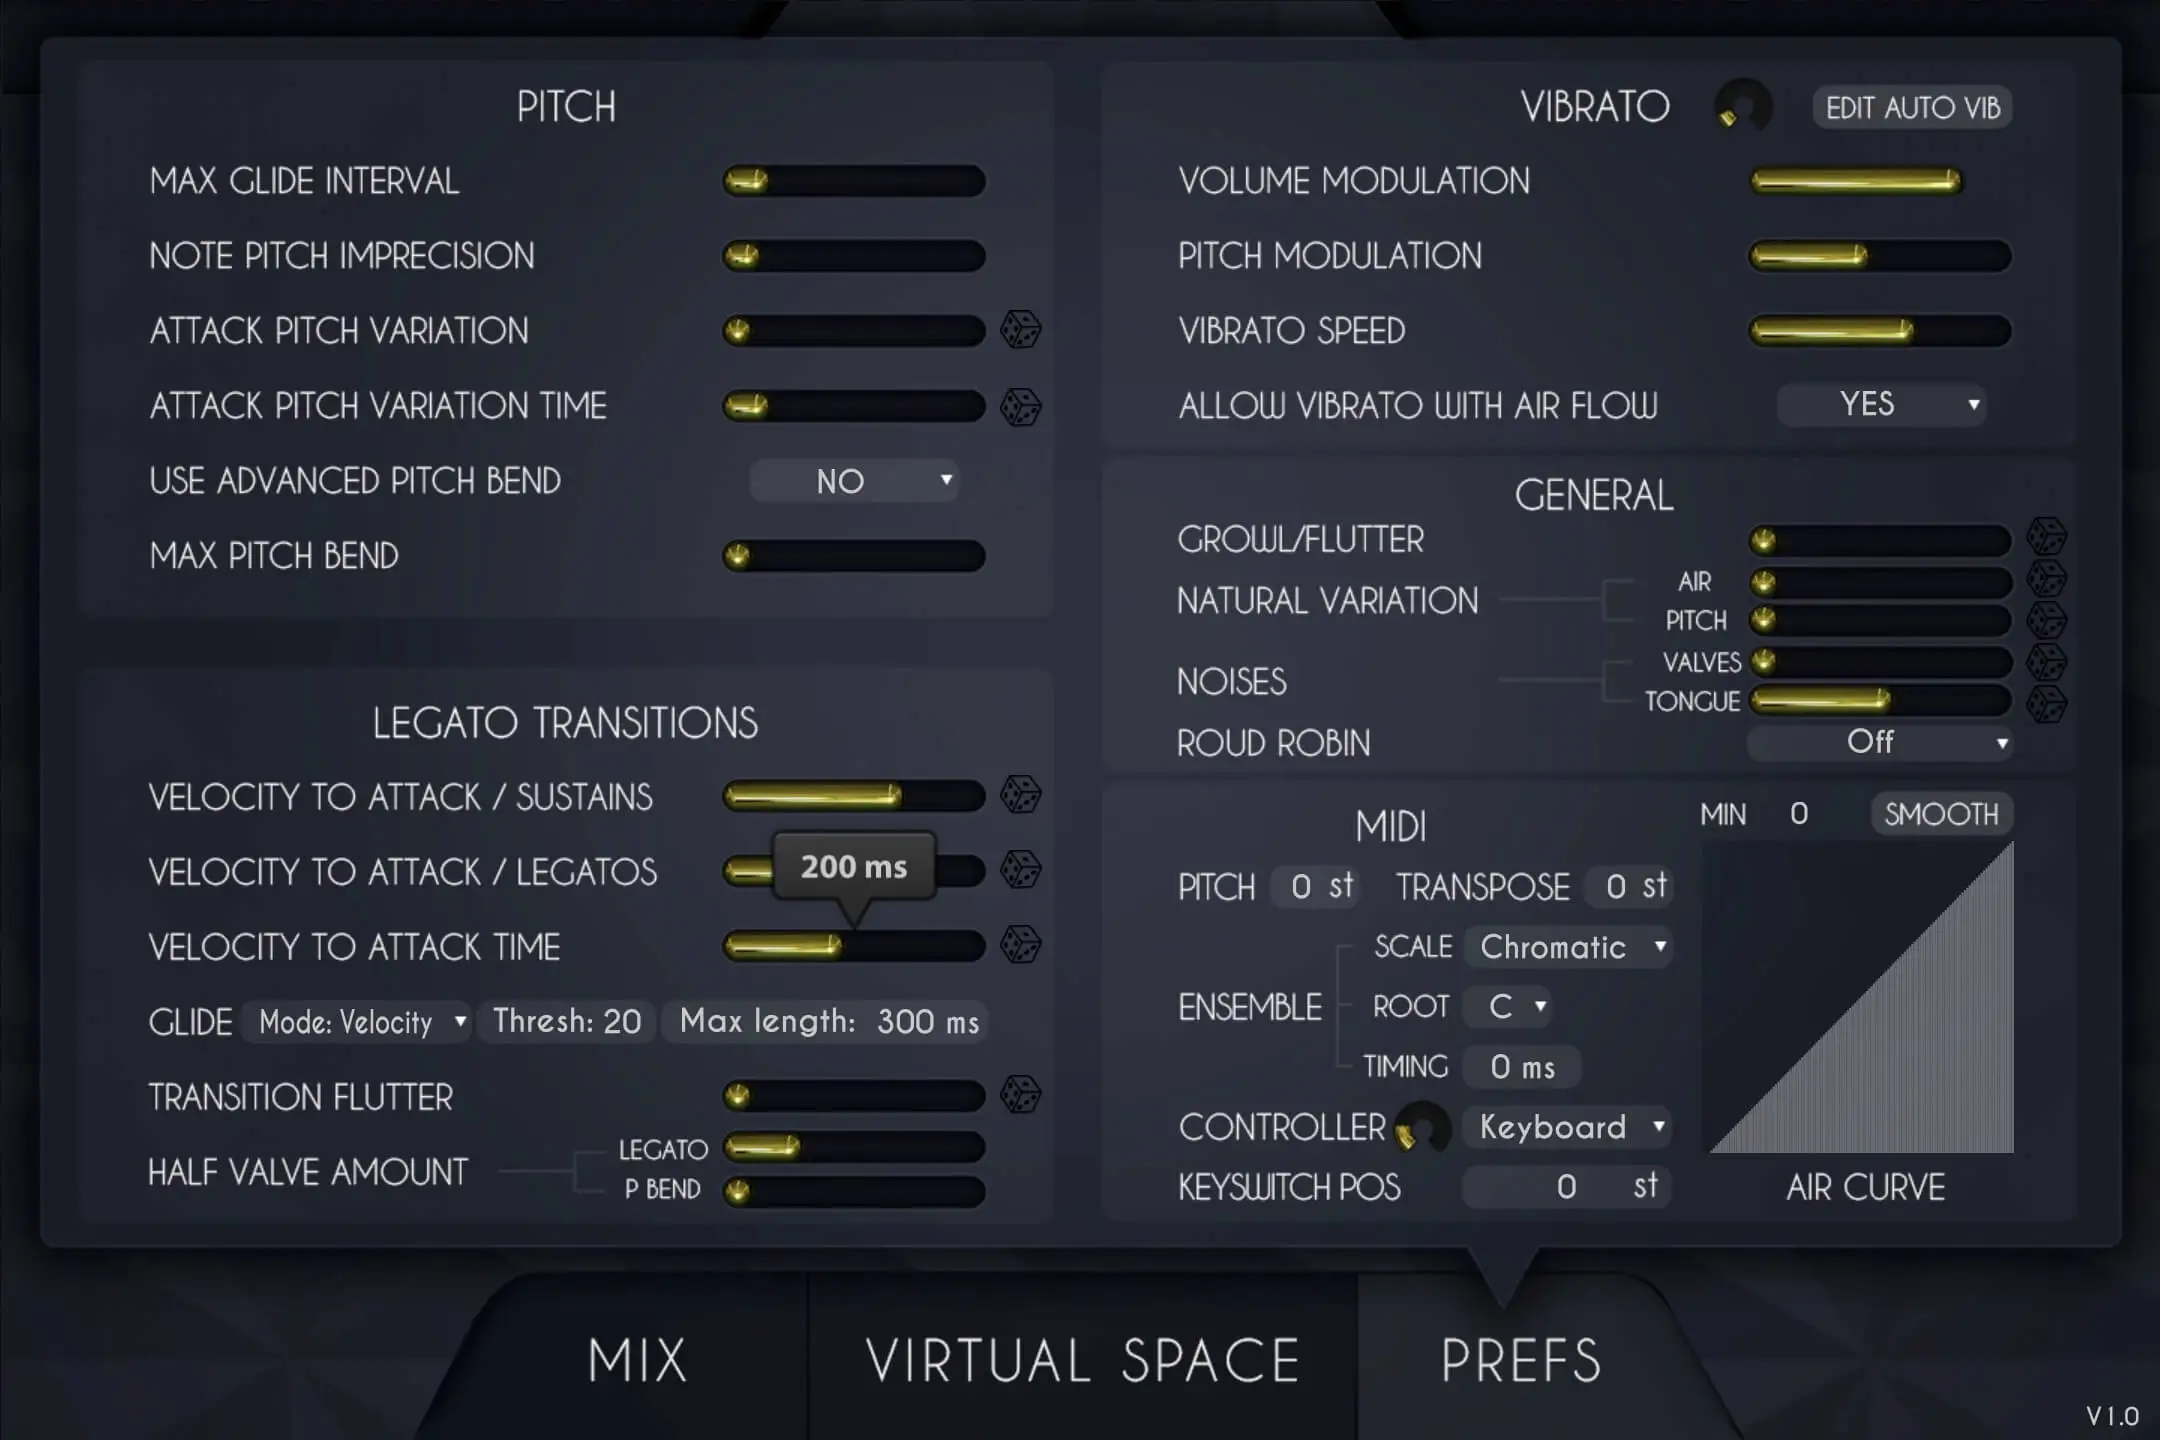
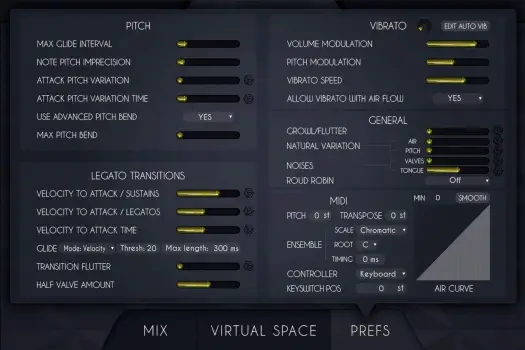
There is an endless number of ways to play a brass instrument, and we took the time to talk to world-class players about the different variations they incorporate into their playing on a regular basis. Based on these discussions, we’re very proud to present the first ‘Advanced Editing’ tab in our VSeries - giving you near-infinite control over these instruments.
Many features listed here are already explained in detail above, but here are the remaining few. Please note that all of the features in the preference tab that have a small die next to them which turns on randomization for an even more unpredictable and life-like performance. Randomize means that the value for that setting will be randomized for each new note, between the minimum value and the value you set.
At the top, you will see a tuning button which opens a panel allowing you to tune each note to your liking. This is very useful for performing music not written for standard tuning systems, or for music that doesn’t use traditional Western classical scales.
Pitch section:
1- The max glide interval controls the maximum interval that you are able to create a continuous glide between. On a trombone for example, the maximum possible glide is from position 7 to position 1, so 6 semitones. We allow for more than 6, but to play something natural, it's better to lower that value as in reality most players will glide a maximum of 3 or 4 semitones and "cheat" the rest. Above that value, our engine will "cheat" as well and skip some notes while still ending up on the target note.
2- The note pitch imprecision is exactly what it says - it will make the notes sound very slightly out of tune, completely at random, between 0 and the value you set. A value of 100% will randomize +/-1 semitone.
3- The attack pitch variation is a bit different, it is technically a fast bend ramp that is almost always present in live performances. It is more or less super-human to play every single note perfectly in tune from the first attack, so in order to create a more realistic sound, this is set slightly above 0 by default. Increasing the value will control how much bend you want (in other words; how far away the sound will be from the note you’re playing) and the attack pitch variation time will decide how quick that ramp is.
General section:
1- The growl/flutter value controls how much growl/flutter effect is added to the sound. A MIDI controller can be assigned to control this in real time.
2- The natural variation air and pitch values control that very quick and almost undetectable variation that even the best brass players can't avoid when they play. Since the air flow should never be always perfectly constant, the timbre and pitch vary all the time and you can control how much of each you want. By default, it is set to 100% which is representative of a very good player with the least variation possible and you can go above that to make the playing more natural.
3- The valve noises lets you control how much noise you hear from the individual valves being pressed on the instrument.
4- The tongue noises lets you control the volume of the small noise produced by the tongue as it blocks the air flow when a note is stopped.
5- The round robin menu lets you control if you want no round robin, a 3x round robin alternating on adjacent notes all the time or a smart round robin which only alternates in fast passages.
MIDI section
1- Pitch: You can pitch the whole instrument up or down up to +-12semitones. This affects the tone of the instruments and can be useful to cover other instruments that have a different range. Pitching the flugelhorn down can make it sound similar to a trombone, for example.
2- TRANSPOSE: This is just a MIDI transposing tool, so for example, a value of 2 semitones will play a D instead of a C. If you use the pitch and transpose at the same time, but opposite values, you will hear the correct note and will only change the timbre and range.
3- The Ensemble will be detailed in the ensemble section below.
4- The type of controller you use can induce a few internal changes. The EWI for example requires some tweaks to play legatos as it does not overlap MIDI notes by default. You can select the type of controller you use from the list here.
5- Next to the controller selection, there is a small dial that controls the reactivity of the controller. On some keyboards, for example, the mod wheel can be non-continuous and have small gaps that lead to unnatural-sounding variations. To fix this, just increase the value on the dial. If you use a breath or wind controller though, make sure this value is set to 0 - otherwise it will be hard to get very sharp attacks. Selecting the right controller will take care of this value change for you.
6- You can change the position on the keyboard of the few keyswitches we use. Here is what the keyswitches do:
7- You can control the response of the instrument to your MIDI controller using the air curve. If for example you don't want the instrument to reach the highest volumes, you can just cut the top end of the curve. Since the curve is not big or precise, you can make sharp changes and hit the smooth button a few times until the curve is perfectly smooth. Changing the MIN value will reset the curve and set what the volume for the minimum of air flow is.
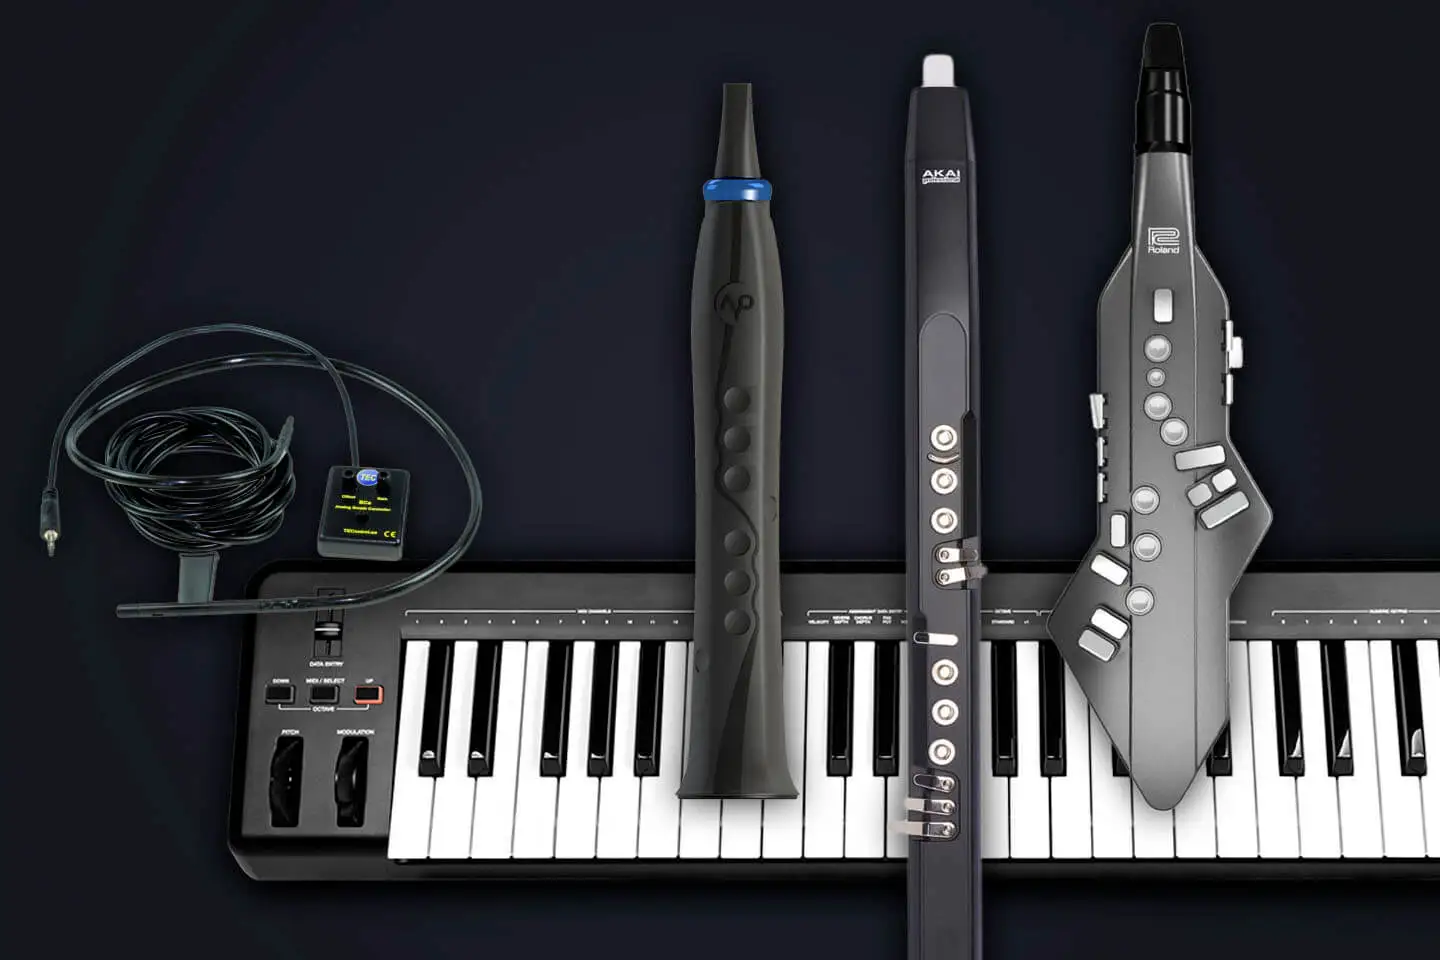
VHorns can be played using a keyboard by selecting the notes on the keyboard and controlling the air flow with a MIDI controller like the modulation wheel or a breath controller.
You can also use a wind controller like an EWI, an Aerophone a Sylphyo or any other brand, in which case you need to use the appropriate controller menu in the MIDI section.
If you load multiple instruments at the same time, it will play unisons exactly at the same time.
We added some smart features that first can change the timbre of the instruments, transpose everything by a fixed interval and also act on the MIDI performance.
For example, you can have all 6 instruments with a different transposition value play the same C minor scale, so no matter what you play on the keyboard, it will sound in key.
Playing ensembles with VHorns is easy, as you can see in the overview video. You can adjust a few things in the MIDI tab.
1- The Transpose values can be changed to get the desired interval change.
2- You can then select a scale and root on which the instrument will be forced to play, no matter what you play on your keyboard. If you select C Major, then whatever you play on your keyboard will stay in C Major even when using the transpose value.
3- The timing value will create a randomized time delay each time a new note is played, this way when you play a note on the keyboard, not all instruments will start at the same exact time just like a section of musicians would do in real life, no matter how good they are.
Once all this is set, it should have plenty of variation, but a good solution to make it even more convincing is to go a step further and just have two different MIDI files with randomized note positions as well as slightly different air flow controls. The best solution would even be to just play the performance twice as it wil introduce all of the necessary variation.
UVI Workstation v3.0.18 is required for the library to function properly, the VHorns will not work on windows XP, or OSX 10.6, it will not work on a receptor either.
107Mb compressed for both Flugelhorns
Sample player
VHorns Flugelhorn plays in UVI Player (formerly UVI Workstation), UVI's free sample player. We provide it with every library you buy, so you don't need an expensive sampler to use our products. It works on Mac (macOS 10.14 or later, Intel or Apple silicon) and Windows (10 or later), standalone or as a plug-in (VST / VST3 / AU / AAX), in 64-bit only. More about it here.
Copy Protection
We use the iLok system to protect our products and you can choose to register your license to your computer or to an iLok dongle. If you decide to use an iLok dongle, both V1 and V2 are compatible with our products. You can activate your license on up to 3 computers or iLok dongles at the same time and you can deactivate one and activate another as many times as you want.
There are no reviews yet. Be the first to write one.
We use Google Analytics to count visits and see which pages are read. Nothing else is tracked, and nothing is shared with advertisers. More about cookies.